Every serious angler should have a broad collection of go-to knots to deal with whatever situation arises while out on the water. While there are several common knots that all fishermen know, these five specialty knots provide alternative attachment options for different lines, weather conditions, and prey.
1. The Turle Knot
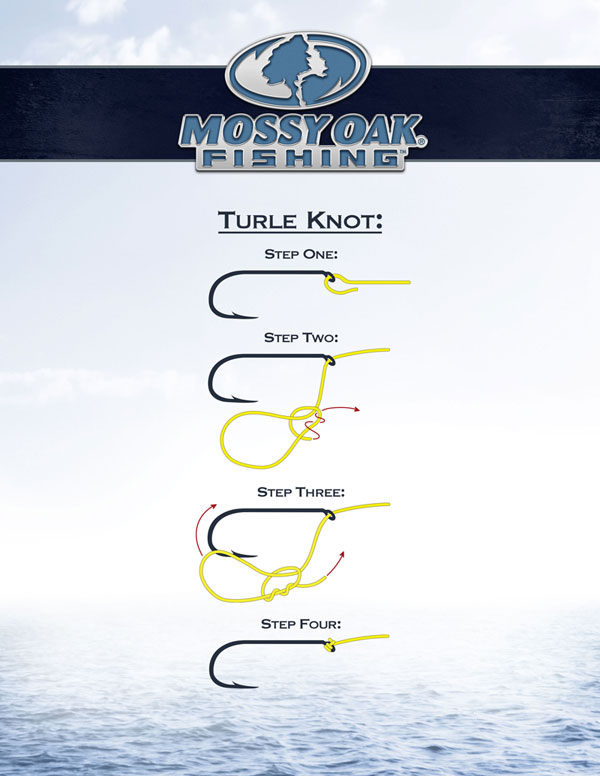
The Turle Knot, popularized by Major William Greer Turle in the 19-century, is a popular knot for fly fishermen. It’s also handy to use for securing a hook to a leader while saltwater fishing. It’s the preferred knot of many fly fishermen because the knot is not dependent on the hook placement in the fly.
To tie a fly, thread the fly onto the tippet, making sure to leave 6-8 inches at the tag end. Pass the line back down along itself, and then bring the tag end back over the double line to create a loop. Thread the tag end through the loop twice to form a double overhand knot, and tighten it slightly. Slip the large loop over the top of the fly, and pull on the leader to secure the knot to the hook eye. Finally, trim the tag end.
For a standard hook without a fly, the process is a little easier. Pass the line through the hook eye and create two large, equal-sized loops with the line. Tie an overhand knot to secure the loops and pass the loops back over the hook. Tuck the tag end back under the loops and pull on the leader line to tighten.
2. The San Diego Jam
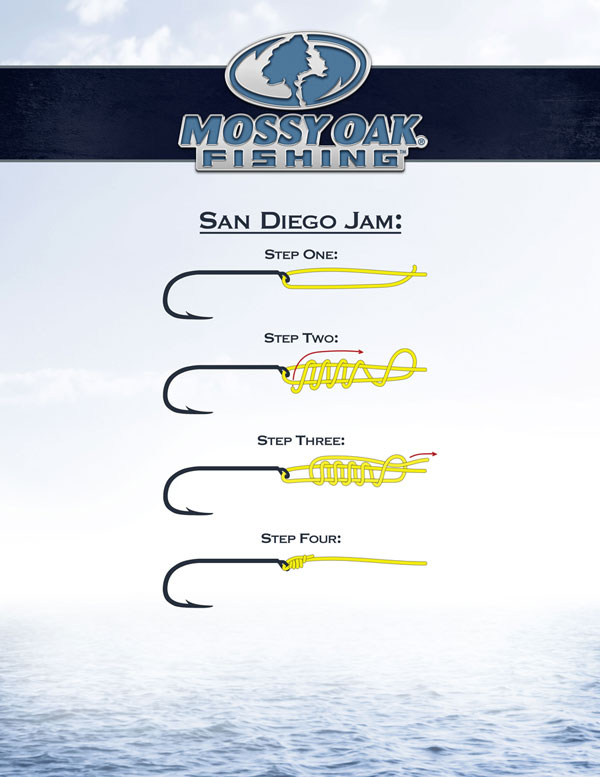
Although less well-known than other specialty knots for fishing, the San Diego Jam is suitable for all types of lines, from monofilament to braided to fluorocarbon. Also known as the Reverse Clinch and Heiliger Knot, it originated as a fast and reliable way for long-range tuna fishermen to secure heavy jigs to their lines. Now, it is used by anglers all over the world for its strength and ease of use, no matter the conditions at sea.
To tie this knot, thread the tag end through the hook eye and pull down toward the lead line, crossing over to form a loop. Wrap the tag end back up the loop toward the hook several times. The number of wraps should decrease as the weight of the line increases. For example, seven wraps are sufficient for a 10-pound line, while three wraps are enough for a 40-pound line. Pass the tag end back through the eye loop, and thread it through the first wrap around the line. Pull on the lead line to tighten it, taking care that the turns don’t overlap and, instead, form a neat spiral.
3. The Spider Hitch Knot

If you are in a hurry but still need a high-strength knot, the spider hitch is a great choice. As the strongest of all the quick knots, the Spider Hitch knot is the ideal way to create a double line connection when attaching your line to your leader if you are under pressure.
Pass the tag end of approximately 8 inches of the line back down to form a loop. Create a secondary loop within the first, and hold it between your thumb and your forefinger. Wrap the tag loop end around your thumb 5-10 times. The more you wrap, the stronger it will be, but the more difficult it will be to secure. Pass the tag loop back through the secondary loop. Hold the tag end and the line in one hand and the tag loop in the other, and pull to tighten the knot.
4. The Australian Braid
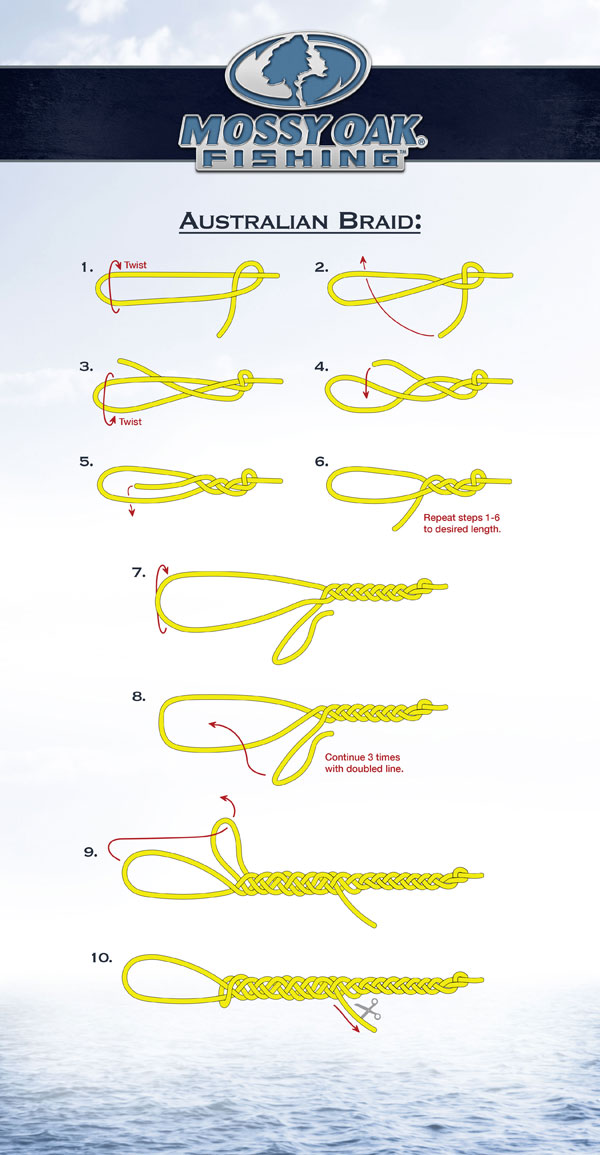
The Australian Braid is a high-strength knot and a suitable alternative to the Bimini Twist, used for creating a double line leader or for loop-to-loop attachments. The number of braids required depends on the weight of the line. Lightweight, 6-pound line requires only an inch of braiding, while line over 50 pounds needs at least 8” of braiding to work well. However, if done properly, the Australian Braid allows you to retain 100 percent of your line strength.
Create a loop, leaving a long tag end, and begin braiding the tag end with the sides of the loop by moving the left line over the center line, then the right line over the center line. Give the line a quick jerk up each time you pass it over the center, to tighten the braid and increase its strength.
Once you have a sufficient braid length, take the tag end and loop it back across to form a bight. Continue to braid, using the bight for another three passes, and finish with the bight loop in the center. Take the whole of the double line loop and feed it through the bight. Pull the tag end up gently to secure the knot without bunching the braid.
5.The Albright Knot
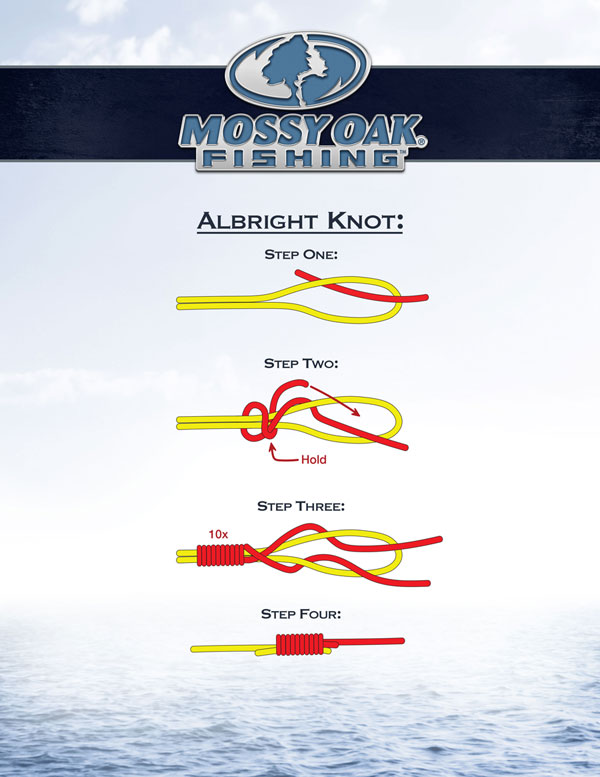
The Albright is a stronger alternative to the Surgeon’s knot that is used to attach two lines of unequal size. This technique works for any diameter monofilament line and can be used for connecting braided line to wire backing.
The slim profile of the knot allows it to slip easily through guides if your fish pulls out enough line to hit the backing that prevents your line from snapping under tension. Serious anglers have been known to cover the knot in rubber cement for added security and increased smoothness.
Tie the knot by first creating a loop in the thicker line. Pass the end of the thinner line through the loop, leaving enough of a lead for wrapping. Wrap the thin line around both sides of the loop 10 times, and then pass the end of the thin line back through the center of the loop. Pull both ends of the line until the knot is secure. You may need to add lubrication to allow the lines to slip over each other and create a snug fit.
Using the right knot in the right conditions is just as important as choosing the best fishing shirt, proper rod, reel, and tackle for your fishing expedition. Add these five specialty knots to your repertoire to increase your chances of landing a trophy fish.