Jill J. Easton & Drew Turner | Originally published in GameKeepers: Farming for Wildlife Magazine
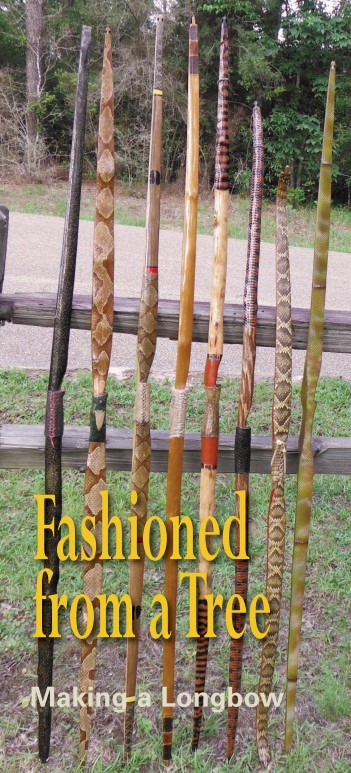
however you would like. Besides being a hunting
tool, each bow is a work of art.
Finding a bow in the heart of a small tree is simpler than you may think, and Renaissance man Drew Turner is just the man to show you how to remove the bow from the wood. Drew, a taxidermist from Hattiesburg, Mississippi, has been crafting beautifully made and decorated longbows since 1993 and does it really well. He enjoys being part of the long tradition of toxophilites, or lovers of bows, which goes back to prehistory.
“I got burned out on all the technical junk,” said Drew. “Using an old-fashioned longbow pays tribute to the many generations of hunters who provided for themselves and their families with something as simple as a tree, a piece of animal sinew and an arrow. It eliminates problems. There are no excuses for not killing a deer except that I missed. There are no peep sites, pins and highly technical equipment that has to be remembered each hunt. I have to depend upon myself.”
But Turner doesn’t stop with making longbows; he has carried the home-grown construction many steps further. He also makes and fletches his own arrows from river cane, then uses the completely handmade combination to successfully hunt deer, hogs and small game. His final step in the cycle was to make hunting clothes from the hides of deer he killed with his bow, tanning the skins using primitive brain tanning techniques and finally crafted them into a set of buckskins that would be the envy of any mountain man.
“The buckskin shirt, pants and high boots make me much stealthier in the woods,” Drew said. “Seems like I can sneak up within a few feet of deer without being detected. Plus, people at our hunting camp think it’s pretty amazing when I suddenly appear out of the trees in my buckskins. Usually they have no idea that I was within miles.”
This piece is about how to make a longbow and arrows and keeping the archer’s craft alive.
Getting people interested in making traditional weapons is part of Drew’s passion for the bowmaker’s art. He often helps new bowyers construct their first bow.
“Every bow is different, there is no cookie cutter approach to bow making,” Drew explained. “Each one is a learning experience. Each bow is made from different wood, has a different draw and is set up for the needs of that shooter. From tree to bow usually takes 30 to 40 hours of work and it can’t be rushed.”
Equipment needed to make a bow includes a band saw, sander and various hand-shaping tools. To find information and bow-making equipment, Drew recommends 3 Rivers Archery. To learn more specialized details of bow-making, The Traditional Bowyer's Bible in four volumes, edited by J. Hamm, is an excellent choice. These books can be purchased online, or from 3 Rivers Archery.
How to Make a Longbow: The Basics
Before starting to construct your own archery equipment, try to find bowmakers groups in your area and on the Internet. These are people who are passionate about primitive archery and are willing to share their knowledge. It is a great help to be able to ask someone who may have faced similar problems how to fix them.
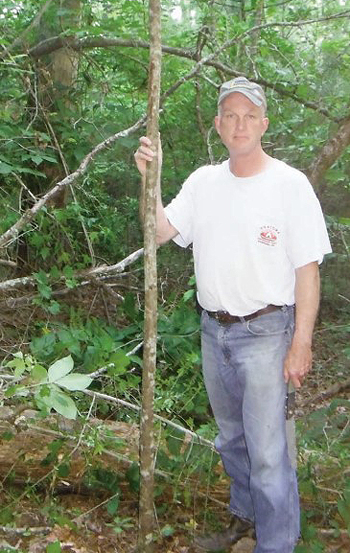
“The first step is to find a suitable tree,” Drew said. “I prefer eastern hornbeam, Osage orange or hickory. The tree should be two to three inches in diameter. Smaller trees are easy to cut and the wood is easier to work with. Find one as straight as possible that has few limbs or defects.”
Cut the tree to get at least six feet of straight bow wood. Then remove the bark with a draw knife or scraper down to the white wood. Finally, coat both ends with Titebond wood glue or paint.
may vary in different regions, but the author prefers
eastern hornbeam, Osage orange or hickory.
“Next, cut out the rough profile of the bow on a band saw,” Drew said. “This will speed up the drying process. Store the wood indoors and allow it to dry for at least two months.” Begin reducing the thickness of the limbs of the bow with a scraper or a farrier rasp. Floor tiller the limbs of the bow against the floor until the bow flexes four inches.” (Tillering is the process of removing wood from the planned bow so that it will bend into the intended shape, draw length and draw weight. Floor tillering means holding the bow against the ground, then applying pressure to the center of the bow to see if it flexes evenly.)
“Cut in the string nocks with a chain saw file, then string the bow with a tillering string,” Drew said. “After the tillering string is on the bow, make sure the bow limbs bend in an even arc.”
Continue to reduce the thickness of the bow limbs until you can string the bow and draw it at least 20 inches. Keep working on thinning the wood until the bow can be brought back to full draw. Remove the tool marks using sandpaper.
Drew continued, “Before continuing on with decorating, decide whether the bow is worth finishing. Test the bow by shooting it. No matter how carefully the tree is chosen and worked and the wood is refined, some pieces of wood just don’t make good bows. Sometimes it’s better to cut your losses and start over rather than to try and turn a bad piece of wood into a straight-shooting weapon.” If the longbow passes the test and is worth decorating, it’s time to add the trimmings.
“A well-decorated longbow is more valuable, more authentic and attracts people’s attention,” Drew said. “It makes me proud to shoot a one-of-a-kind bow that has snakeskin, beaver tail, bone, leather or other details that makes it uniquely mine and gives it natural camouflage.”
The first step is to stain the bow with wood stain and then apply a waterproof finish. This safeguards the longbow from weather and damage. Then comes the hardest decision: What material will be used to decorate the bow? This is something you have to live with as long as you shoot the weapon, so choose carefully. The grip needs to have a leather handle to prevent slipping, but colors and other decorations should be uniquely your own.
well, is a great choice to make arrows from.
Making River Cane Arrows
A longbow is an excellent projection implement, but a bow without an arrow is just a piece of wood. Making a good arrow that matches the bow and the shooter is an essential part of getting an arrow into the target.
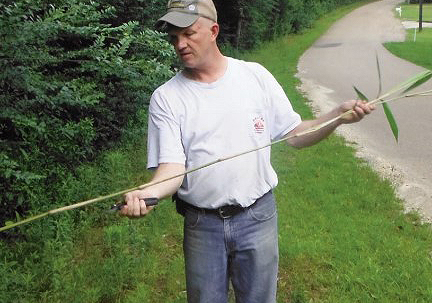
River cane is virtually free and can be harvested along most rivers in the southern United States. Drew likes the bamboo-like plant for arrows because they are straight, take fletching and shoot well.
“The cane grows near water close to creeks and river banks and is easy to find,” Drew said. “It is the best natural arrow material found. Once it is straightened and dried it is very durable and has a natural taper that makes it shoot straighter than other materials.”
Cut your cane longer than is actually needed, then partially straighten each once while it is still green. Then put them in bundles to season, this can take two to four months. After the canes dry, straighten the shaft of the arrow a second time over a heat source such as a hot plate or stove.
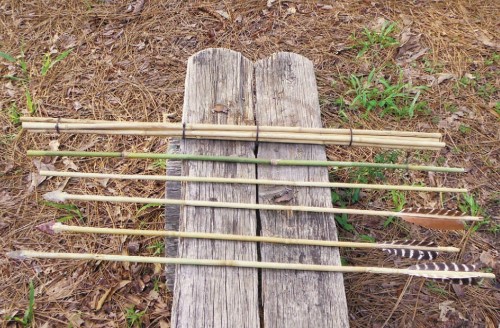
The canes grow in hollow segments. To make an arrow, insert a hardwood foreshaft (hickory, walnut, dogwood, etc.) into the hollow on the front end. Leave part of the hardwood sticking out to hold the arrow point, or broadhead. This will strengthen the arrow. A string nock should be cut into the other end of the cane for the bowstring to fit.
Each cane will need to be straightened over a heat source after they are
seasoned.
Fletching, which is usually three strips of shaped feather, is glued above the nock of the arrow. These strips are made from turkey or chicken wing primary feathers and are fastened on with sinew and hide glue. For hunting, Drew prefers the fletching to be four or five inches long.
Finally attach a flint, obsidian or metal arrowhead to the foreshaft and fasten it in securely with narrow strips of sinew. When your unique work of the bow-makers’ art is finally finished, you will have a weapon that is simple, yet durable and practical. Whether you use it for target shooting or take it into the woods for game, with a bit of care it will last for decades.
For Drew Turner, making a longbow is more than just turning a piece of wood into a useful tool. It is a link to the tradition that goes back to earliest man. He also feels the importance of sharing these skills with the next generation.
“My granddaughters often follow me into the woods,” Drew said. “I take them along with me to pick out the perfect tree for longbow making. My oldest granddaughter, eight-year-old Alexis, informed me she was now old enough for her own home-made bow. She also told me she wanted it to be pink with snakeskin backing. It wasn’t long before we found a copperhead and the right tree and the bow came together.” Just like her “PopPop,” the young archer began to practice her skills of hunting.
“It won’t be long until she will be stalking her own deer,” Drew said with a smile. “Watching new longbow archers build their shooting skills and eventually their own bows is what gives me the greatest pleasure and hope for carrying on the bow builder’s art.”