By: Monte Burch
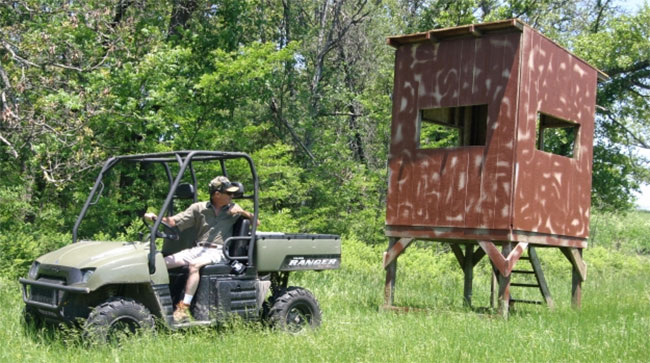
Shooting houses are very popular with hunt clubs, hunting lodges and private land owners. These houses provide a comfortable means of stand hunting for deer and even turkeys. You’re not only out of the weather, but a heater can also be added for those long waits on bitter cold days. Some houses are simply “tree-houses” constructed in or against a tree. Others are free-standing and placed over food plots, trails and other frequently used deer areas. A portable shooting house, such as the one shown, offers all the benefits of a traditional free-standing shooting house, yet can be moved as needed with a four-wheel drive auto, tractor or even a large size ATV utility vehicle.
You or your hunt-club members can build your own shooting house or houses quite easily. Only basic woodworking skills and a few hand tools are needed. A cordless circular saw, drill and impact driver however greatly speed up the work.
Shown is a shooting house built on a raised platform on skids. The platform should be constructed of pressure-treated lumber for longevity and strength. Its best if the house is framed in treated materials as well. The house shown was made of recycled Wolmanized Residential Outdoor Wood. The wood is Southern pine, pressure-treated with a copper azole preservative.
Steps to Building a Shooting House
Build the Platform
- Find as level of an area to build and assemble as possible.
- Cut the skids from 2 x 6’s and cut angles on each end. This prevents the skids from digging into the ground when the house is pulled around.
- Cut 4 x 4 support posts to the correct length and fasten the support posts to the inside of the skids, using three-inch deck screws designed for use with pressure-treated wood.
- Place the bottom edges of the support posts two-inches up from the bottom edges of the skids. Again, this prevents digging in when the house is pulled. Use a carpenter’s square to make sure the posts are installed square with the skids.
- Cut the side top pieces and fasten in place to the top outside edges of the posts.
- Stand both post sections upright and brace in place or have someone hold them for you.
- Cut the front and rear bottom support braces and fasten to the posts down on top of the skids.
- Cut the top front and rear support braces and fasten to the top front and back edges of the posts.
- Cut the diagonal braces and fasten in place, using a carpenter’s square to make sure the assembly is square.
- Cut the 2 x 6 floor joists and anchor them in place with screws through the front and rear braces into the ends of the floor joists. Joist hangers can also be used for additional support.
Construct the Steps
- Fasten the step support brace to the back ends of the skids.
- Cut the “stringers” to the correct angle and length and fasten to the rear upper support brace and to the step support brace.
- Cut 2 x 2 step supports and fasten to the inside of the stringers.
- Cut the steps and anchor them down on the step-support pieces and with screws through the sides of the stringers into the step ends.
The Floor
The floor should also be constructed of a weather- or water-proof material. ¾-inch exterior or marine grade plywood can be used, or 5/4-inch pressure-treated decking materials can be used. I had 2 x 6 decking material left over from refurbishing a deck and used them for the floor. Anchor the flooring in place with deck screws.
 Building the "House" Portion
 Building the "House" Portion
The “house” portion is constructed in the same manner as erecting any standard building, except you’re erecting it on the raised platform.
- Cut the pieces and build the back wall.
- Lift the wall into place and temporarily brace with 2 x 4’s. Use a carpenter’s square to make sure the back wall is square with the floor.
- Anchor the bottom sill plate of the wall to the platform flooring.
- Construct the front wall in the same manner and anchor it in place, again bracing temporarily, and making sure it is installed square with the floor.
- Construct the side walls, measuring so they fit between the front and back walls.
- Erect the side walls and fasten them to the front and back walls and down on the platform flooring.
- Cut out the door section sill plate.
- The 2 x 4 rafters are cut to fit and fastened in place.
Siding
The house can be sided in various ways. The quickest method is to purchase house siding panels, such as Louisiana Pacific Smart Panel siding.
- Nail the front and side panels in place.
- Using a portable electric drill, bore a starting hole at each corner of the windows from the inside.
- Use a portable circular saw or reciprocating saw to cut the window openings.
- Measure the cut-out for the door from the rear panel, cut it out and then install the panel in place.
- Cut the rear window opening.
An alternative is to use solid wood siding, either lap or vertical board and batten. The latter is a good way of utilizing recycled lumber. In this case the individual boards are cut and installed around the doors and windows. The door is assembled in the same manner. The door is made by ripping 2 x 4’s into 2 x 2’s (1-1/2 x 1-1/2 inches) and creating an inner frame, then covering the frame with siding materials. Hinge door in place and install an exterior lock set.
The Roof
- Cut ¾-inch sheathing or exterior plywood for the roof. Further roof protection can be provided by roll felt or even asphalt shingles.
*Optional Railing
You may also wish to add a 2 x 4 railing for protection when using the steps. Paint the house and stand, adding the camouflage design of your choice. Camouflage netting stapled to the inside of the windows and with shooting slits, as well as a section of old carpeting completes the house.
Materials List
- Skids: 2 x 6” x 9’6” Qty: 2
- Support posts: 4 x 4 x 48” Qty: 4
- Side top pieces: 2 x 6 x 72” Qty: 2
- Upper and lower front and rear support braces: 2 x 6 x 72” Qty: 4
- Diagonal braces: 2 x 6 x 24” Qty: 8
- Step brace: 2 x 6 x 72” Qty: 1
- Step stringers: 2 x 6 x 53” Qty: 2
- Step supports: 2 x 2 x 5” Qty: 8
- Steps: 2 x 6 x 24” Qty: 4
- Floor joists: 2 x 6 x 72”, cut to fit Qty: 2
- Flooring: decking to cover 6’ x 6’
- Front and rear top and bottom plates: 2 x 4 x 72” Qty: 4
- Rear studs: 2 x 4 x 78” Qty: 4
- Front studs: 2 x 4 x 84” Qty: 4
- Side top and bottom plates: 2 x 4 x 65” Qty: 4
- Side studs: 2 x 4 x 84”, cut to fit Qty: 8
- Rear window framing: 2 x 4 x 26 ½” Qty: 2
- Rear door top frame piece: 2 x 4 x 30” Qty: 1
- Front and side window framing: 2 x 4 x 40” Qty: 6
- Jack studs: 2 x 4 x 33” Qty: 9
- Jack studs: 2 x 4 x 28” Qty: 9
- Door frame: 2 x 2 x 18’, cut to fit Qty: 1
- Hinge Qty: 1 pair
- Knob: 1 exterior lock set req’d.
- Rafters: 2 x 4” x 6’, cut to fit Qty: 5
- Roofing: to cover 6’ x 6’
- Railing: 2 x 4 x 48” Qty: 1
- Railing support: 2 x 4 x 36” Qty: 1
- Siding: to cover four sides, 6 x 7-1/2
*Optional Powertools to Minimize Time
- Portable Electric Drill
- Circular or Reciprocating Saw